Permalinks

Part of the popularity of WordPress is how easily it makes a website functional and yet attractive. One of the smaller details that you might want to adjust is how the addresses to your blog posts are structured. Permalink is the name given to the address of an individual blog post because they are “permanent links”. For this example, the web address we’ll use for this sample blog is yourdomain.createuky.net. The link to the first post, titled “Hello World” may be structured in many ways. The screenshot below shows one way: “http://yourdomain.createuky.net/blog/uncategorized/hello-world”.

With WordPress, you have many options to form the links to posts, and you can change them to work for your particular content.

  1. To change the permalink structure, start by going to the Dashboard.
    Screen shot of WordPress Dashboard
  2. Next, go to Settings > Permalinks. By default, your blog will use a “custom structure” that includes a category select and the name of the blog post.
  3. If you are not using categories, or prefer a different look to your blog post addresses, there are several choices under Common Settings.  A popular choice is to use the Post name choice, which is a bit more informative. So our post titled “Hello World” will have an address of “http://sstrauss.sites.haverford.edu/blog/hello-world”.
  4. If you want to have the date as part of the address, you can choose Day and name or Month and name. You can also change the structure of category and tag names under the Optional section.
  5. Finally, when you write a blog post, you have the option of editing the permalink for an individual post. Just click the Edit button (underneath the Title field).
  6. Then type in whatever is appropriate (and hasn’t been used yet). Generally, you want to make it as simple and short a word, or words, as makes sense.

WordPress Themes

When it comes to WordPress, customizing the look of your site is simple and straightforward. When you install WordPress, the default (or pre-set) theme is called Twenty Seventeen (as of WordPress version 4.8). It is a very customizable theme.

You can find general information about Twenty Seventeen here.

In addition to Twenty Seventeen, you’ll have other themes available to you. (What themes you have depends upon if you did a default WordPress installation, or if you installed a special package.) If Twenty Seventeen doesn’t meet your needs, you can activate another theme on your site or install a completely new one.

Activating Themes

  1. Start at your site’s Dashboard.
    Screenshot of WordPress dashboard
  2. Navigate to Appearance > Themes.
    screen shot of WordPress theme options
  3. You will see thumbnail images representing each of the themes that you currently have available on your site. Simply mouse over any one of them, and click the Activate link.
    screen shot of activating different wordpress theme

That’s all you need to do to change the look of your site with a new theme.

Installing Themes

If none of the themes that were provided when you installed WordPress are what you’re looking for, you can always search for and install other themes from the WordPress Theme Repository.

  1. Navigate to Appearance > Themes.
    screen shot of WordPress theme options
  2. Installing new themes is quite simple. You start by going to the Add New Button.
    Screen shot of
  3. The initial page is the Search Theme page, and it’s not visually helpful. You can check a few filter boxes to see what comes up, but there is a more visual way. Click the Featured link at the top and you’ll get visual (screenshot) examples of other themes you can install. You can also click Newest or Recently Updated.
  4. Under the thumbnail picture of each theme (when you hover your mouse over the theme) are three choices – InstallPreview, and Details & Preview. Those choices should be pretty self-explanatory so click Install to add a new theme to your site.
  5. After you install the theme, it is still not active on your site. You will need to Activate it to use it.
    Activate desired theme by clicking

Once activated, your site will be using the new theme. Visit your site’s homepage to view your new theme.

Understanding Accounts & Passwords

One aspect of createuky.net that users may find a bit complicated at first is understanding the different accounts (and associated passwords) that you can manage as part of your participation in the project. This article outlines the types of accounts that you are likely to have, what they are for, and how you go about resetting passwords on each of them.

Your cPanel Account

When you first sign-up for your domain and hosting, a cPanel account will be generated that provides you with access to your slice of the createuky.net web server. Your cPanel account is automatically associated with your CreateUK username. Therefore, your CreateUK username will grant you access to your cPanel account.

Your Application Administrator Accounts

Every time you install a new application in cPanel, an Administrator Account for that application will be created. You will likely use these accounts very often – every time you need to login to your application to manage the associated website, you will use this account.

For example, if you install WordPress to manage your Web site, every time you need to add content to WordPress, change your theme, approve comments, etc. you will use this account to login.

Usually, you will be given the opportunity to choose the username and password for that account. We recommend choosing something that you are likely to remember but that is strong and secure.

Upon installation, you will likely receive an email confirming the user-id/password combination you chose. It will also have information about how to access the login page for that application. You may wish to make sure you don’t delete this message.

Depending on the application you’re working with, managing and resetting the password for this account will vary. If you’ve used Installatron (in cPanel) to install the application, however, you can always review the account credentials:

  • Login to cPanel through https://createuky.net/dashboard/
  • Click the Installatron icon in the Software/Services section.
  • Find the application you installed under My Applications.
  • Click the Edit button (this looks like a blue wrench).
  • Scroll down to find the Administrator Username and Password.

In addition, most applications should have some kind of password reset link on the login page. For more information on resetting your application password through Installatron, click here.

Other Types of Accounts

In addition to the account types outlined above, there are a few other kinds of accounts you may have as part of createuky.net:

  • When you sign up for subdomain/top-level domain on Stateu.org, cPanel will automatically create an FTP account for you by default. You’ll also have the option of manually creating your own FTP account. You can learn about their differences here.
  • Application User Accounts: In addition to the Administrator Account that you set up when installing an application, most applications will also let you set up user profile accounts within each application.

Neatline Plugin

Building an interactive map using Omeka’s Neatline plugin

Neatline is a plugin for Omeka that allows for the creation of interactive maps and timelines. Neatline allows the user to plot points on geospatial layers that, when clicked, reveal text and media. Users may create records from scratch and add them to their Neatline exhibits, or import existing items from Omeka. See Neatline.org for demos of this tool in action and more documentation.

Before using this tool, you’ll need to install the Neatline plugin to Omeka. If you’ve already installed the Escher plugin, you can use it to install Neatline. If not, follow the instructions on the “Installing Plugins” section of this support page.


Vocabulary

Item: Omeka’s basic building block, containing text, media, and/or metadata.
Collection: A group of items, typically sharing a common theme.
Record: Neatline’s version of items. Can be created on their own, or imported from an existing item in Omeka.
Exhibit: A Neatline map or timeline; contains your records.
Widget: An add-on tool for Neatline, such as Waypoints.
Spatial layer: A navigable map that Neatline can use, typically pulled from Google Maps. The various options Neatline offers have different aesthetics.


Setting up (first time only)

1. Install the Neatline plugin (see above). Install any additional supporting plugins you’d like, such as Neatline Waypoints.

2. Go to your Plugins page in Omeka. Then, click “Configure” to the right of Neatline. On the configuration page, click the link to developers.google.com/maps/web. If possible, open this link in a new tab, since you’ll soon need to return to the configuration page.

3. On the Google page that opens, click the “GET A KEY” button at top right. Follow the prompts in the pop-up window to create a new project, named whatever you’d like (this title won’t matter for your Neatline projects). When you’re given a long string of characters, copy it. This is your Google Maps API Key. You’ll only need it once.

4. Return to the Neatline configuration page from step 2. Paste your API Key into the text box. Then click the green “Save Changes” button. Neatline is now connected to Google Maps.

5. Click Settings at top right of your Omeka dashboard. In the text box to the right of “ImageMagick Directory Path,” enter this exact text without the quotation marks: “/usr/bin”. Then click the green Save Changes button at top right. This will allow Omeka to handle your images properly.

Neatline is now ready to go!


Laying the foundation

1. Optional: create one or more collections. This is an organizational tool: by creating collections now, you’ll be able to sort your items or bulk import them to Neatline more easily later. To create a collection, click “Collections” on your lefthand Omeka dashboard menu. Then, click the green Add a Collection button. On the Add a Collection page, give your collection a Title (you can leave all other boxes blank). If you want to add formatting to your text such as bolding or italics, check the box next to “Use HTML,” and more editing options will appear.

When you’re done, check the box next to “Public” and then click the green Add Collection button.

NOTE: You’ll see many fields when creating collections or items, but there’s no need to panic: almost all are optional and exist for archival purposes. Only fields with a * after them are required.

2. Begin creating items. Omeka is a tool for curating artifacts. In this step, you’ll begin this curation by creating items. To create an item, click “Items” on your lefthand Omeka dashboard menu. Then, click the green Add an Item button. On the Add an Item page, give your item a Title and a Description (you can leave all other boxes blank). This is the text that will ultimately appear to viewers of this record on your Neatline map. If you want to add formatting to your text such as bolding or italics, check the box next to “Use HTML,” and more editing options will appear.

Check the box next to “Public.” If you wish to add this item to a collection, select it from the dropdown menu under “Collection.”

If you wish to add images to your item, click the “Files” tab, then click “Choose File.” Follow the prompts to upload an image. To upload more images, click the green Add Another File button. These images will be displayed alongside your text when a viewer clicks the relevant point on your map.

If you wish to add tags to your item, click the “Tags” tab, then enter all desired tags in the text box, separated by commas. Remember to click Add Tag afterward.

When you’re done adding text, files, and tags, click the green Add Item (or Save Changes if you’re editing) button.

You can always find your list of items, with the option to edit each one, by clicking Items on your Omeka dashboard. From the Items page, you can also use the blue Search Items button to filter items by user or tag.

Clicking “Tags” on the Omeka dashboard will bring you to a list of all your tags. Click a tag’s name to edit it, or click the number to its left to view all items with that tag.


Managing Neatline exhibits and using the editor

1. Create an exhibit. Your Neatline map will be known as an exhibit. It’s now time to create this map. Click Neatline on the lefthand dashboard menu, which brings you to the Browse Exhibits page. Then click the green Create an Exhibit button.

On the Create an Exhibit page: give your exhibit a Title, Narrative (optional but recommended), and Widgets (if you’d like to use Waypoints or another add-on you’ve previously installed). The Narrative is the exhibit’s primary textual description, and it will appear alongside your map.

Scroll down and select a Default Spatial Layer from the drop-down menu. The Default Spatial Layer is the default map style your exhibit will display. You can edit this any time, so try out a few and see which aesthetic you like best. You can also optionally use the Embed Spatial Layers field to allow your viewers to toggle between various map styles.

The only other setting you need to change here (eventually) is Public: when you check this box, your exhibit will be live. When you’re done, click the green Save Exhibit button at the bottom of the form.

2. Access the Neatline editor. Return to the Browse Exhibits page from step 1. To access the editor, click your exhibit’s title. Clicking Public View or Fullscreen View will let you preview how your exhibit will look to visitors.

Here is what the editor looks like. Notice the Records, Styles, and Plugins tabs, and the list of records below the blue New Record button (there won’t be any records until you add some):

3. Set the default focus. This is the latitude/longitude and zoom that viewers will see when they first open your map (they’ll then be able to move it however they’d like). In the editor, click the Styles tab. Click and drag on your map to move it around, and use the + and – symbols at top left to zoom in and out. When you’re satisfied with the current view of the map, click the Use Current Viewport as Default button. This will automatically fill-in coordinates and the depth of zoom. You can also manually add these. When you’re done, click the blue Save button.

4. Import items into your exhibit, which then become records. First, click the Records tab in the editor. Then, click the large blue New Record button.

New tabs will appear. Click the Item tab. You’ll see a drop-down menu called “Search Omeka items.” This will list all the Omeka items you’ve previously created. Find the item you wish to add to the map and select it. The item’s content appears below the drop-down menu. If it looks correct, click the blue Save button. If not, click “View the item in Omeka,” edit the item, and try again.

NOTE: If you edit an item in Omeka that you’ve already imported into your Neatline exhibit, its record in the exhibit will be automatically updated.

NOTE #2: You can also create records from scratch using the New Record button and the Text tab (without making an Omeka item first). However, this isn’t recommended if you wish to include images or other media in your record, since that media would require additional HTML formatting.

5. Pin your records to the map. You can access any of your records from the list of records on the editor’s main page (see the screenshot in step 2 of this section, looking under the New Record button). Once you’re in a record, you can place it on the map. If you’ve just created a record using the Item tab from the previous step, then you’re already in that record.

Once in the record, click the Map tab. You can draw many different shapes here (and feel free to experiment!), but for our purposes, we’ll look at two buttons: “Navigate” and “Draw Point.”

When “Navigate” is selected, you can move your map around without adding anything. When “Draw Point” is selected, you can click on the map to place a blue pin. When a viewer clicks this pin, she’ll see the record associated with it. When you’re done, click Save.

For example: I have a record containing text and images about Shakespeare’s first performance of Henry V in London. I can go into my Henry V record and use “Draw Point” to place a pin on London. Now, the viewer can click the blue dot on London to bring up this record.

Optionally, you can use the Style tab in a record (to the right of the Map tab) to change the appearance of points and shapes for that record.

You can add as many interactive points or shapes as you’d like.

6. Add widgets to your record (optional). If you’re using the Waypoints widget, select it by clicking in the Widgets field. See the next step for more information about Waypoints.

When you’re done, click Save. Then, you can exit out of the record and back to the editor’s main page by clicking the X above the Style tab. You can return to Omeka by clicking “Return to Omeka.”

7. Adding Waypoints: a table of contents for your map. The following guide from Neatline.org explains how to add a list of clickable records to your map, so viewers can jump from point to point without searching the map for them:
http://docs.neatline.org/working-with-the-waypoints-plugin.html


Linking your maps to your Omeka home page

1. Choose what links you’d like to display on your home page’s navigation menu. This menu may appear in a slightly different place on your homepage depending on your theme. Here’s what it looks like in one of Omeka’s built-in themes (“Thanks, Roy”):

To edit this menu: from your Omeka dashboard, click Appearance in the black bar at the top of the screen. Then click the Navigation tab.

This takes you to a checklist of links. Each checked link will appear on your home page’s menu. To edit a link’s label (name) or URL, click the small black arrow to its right.

To add a new link: fill in the Label and URL fields at the bottom of this page, and then click Add Link. You can reorder the menu by clicking and dragging the links. When you’re done, click the green Save Changes button.

By default, there will be a link called “Neatline” which takes your viewer to a list of your Neatline exhibits. This is called the Browse Exhibits page, and looks like this:

If you’d rather have links on your menu to one or more specific exhibits, first pull up that exhibit’s public or full-screen view (see the screenshot for step 2 under Managing Neatline exhibits and using the editor above). Copy the URL from the address bar at the top of your browser. Paste it into the URL field on Appearance > Navigation, give it a label, click Add Link, and then Save Changes.

2. OR, choose a different default home page.

To use a list of your Neatline exhibits as your home page:
On Appearance > Navigation, click on the drop-down menu under “Select a Homepage” (to the right of the link checklist). Select “Neatline” (or whatever you’ve renamed it). Click Save Changes to finish.

To use a specific exhibit as your home page (taking your viewer directly to the map):
On Appearance > Navigation, add a link to the public or fullscreen view of the map you wish to be the homepage (see the previous step). Then, click on the drop-down menu under “Select a Homepage” (to the right of the link checklist). Select the link you’ve just added. Click Save Changes to finish.

Now you can share your Omeka site’s address with whomever you’d like, and they’ll be able to explore your interactive map!

Signing Up

Review the Guidelines

Before you get started, we recommend that you review our information about Choosing a Domain Name.

The Sign-Up Process

Once you’ve reviewed the guidelines, you can proceed to the sign-up page.

  1. Click the “Get Started” Button
  2. You will be redirected to login for verification. You will use your CreateUK username and password to log in.
  3. You are now ready to create a domain. To start, you must first sign up for a free subdomain (i.e. yoursite.createuky.net). Directions for purchasing a Top Level Domain (i.e. yourdomain.com) will be provided further down.

Option 1: Free Subdomain

For no cost, you can create a subdomain of createuky.net.

To create a free subdomain of createuky.net, leave this default option selected and enter the subdomain name you want for your website. When you’ve found an available subdomain, click the button labeled “Continue.”

Confirm that you like the name you selected. If you do, click the “signup” button. (If not, click the “start over” button, and repeat the above step.)

You should now see a screen confirming that your subdomain is ready. After a few seconds, you will see the regular cPanel options.

Option 2: Buy a top-level domain from Reclaim Hosting

It is easy to create your own top-level domain. This allows you to select a URL for your website that is easy to remember and share.

While you are at University of Kentucky, this is available for a nominal cost (currently $15/year). You can continue to use this domain after leaving CreateUK, although the cost may increase.

To register a top-level domain log into your newly created cPanel, navigate to the Domains section, and click Register Top-Level Domain.

This panel offers a step-by-step guide to registering and adding a new top-level domain to your new cPanel account.

Option 3: Connect an existing domain to your cPanel

If you already have an existing domain that you’ve previously registered elsewhere, simply point your domain’s nameservers to ns1.reclaimhosting.com and ns2.reclaimhosting.com.

Migrate to Reclaim Hosting

Step One: Signing up for an Account

The first step will be to sign up for an account at Reclaim Hosting. This link will take you directly to their Student/Individual Hosting plan option.

-If you already have a Top-Level domain (i.e. yourdomain.com) choose the I will use my existing domain and update my nameservers option.

-If your current website content exists on a subdomain (i.e. yourdomain.createuky.net), select the Register a New Domain option.

-Enter a new top-level domain name

Complete the sign-up process/pay invoice. If you’d like to take advantage of a 10% discount, enter the promo code reclaim4edu.


Step Two: Let Reclaim Hosting Know

Send a support request to support@reclaimhosting.com with the following message:

Hello Reclaim Hosting Support,
I am graduating from (your school) and I would like to migrate my account, (your domain), to Reclaim Hosting. Please let me know if you need anything else from me.
Best,
(Your Name)

A member of Reclaim Hosting support will respond & help you get your account migrated within 24 hrs.

General Settings: Title and Tagline

Now that you have your WordPress installed and running, it’s time to look at some basic settings for your site.

  1. The place that you will access the settings for your site is called the Dashboard, and it provides the starting point for accessing all of your sites dials and knobs.Screenshot of WordPress dashboard
  2. The setting we will look at here is your blog “title” and “tagline”. It is located in Settings > General. Once you’re on the General Settings page, you can give your blog any title you want. You can also give your blog a tagline, which can be a short description of the blog.

When you change the Blog title and tagline, they will show up at the top of your site. Depending on what theme you use, the title and taglines will show up in various places. In the case of some themes, they might not show up at all depending on whether they allow custom configurations. We won’t worry about that for now.

There are more settings on the General Settings page, such as setting the administrative email account, time zone, date format, etc. Change those to whatever is appropriate for your site and geographical location.

Reading Settings – Front Page

WordPress is a very flexible platform for creating full-blown websites, not just blogging sites. This page will show you how to change the “front page” of your website.

As we have said before, WordPress provides two primary content types for you two work with: posts and pages. Posts, as in blog posts, are a somewhat complex form of a webpage. Each blog post gets published in reverse chronological order, on the front page of a WordPress site. You write a new post, and it gets published at the top of the front page. Pages are a more static form of content. They are additional areas to put information that doesn’t change much. So what if you would like to make the front page of your WordPress site based on a page instead of your blog posts?

  1. Start at the Dashboard.Screen shot of WordPress Dashboard
  2. Navigate to Settings > Reading.screen shot of WordPress reading settings
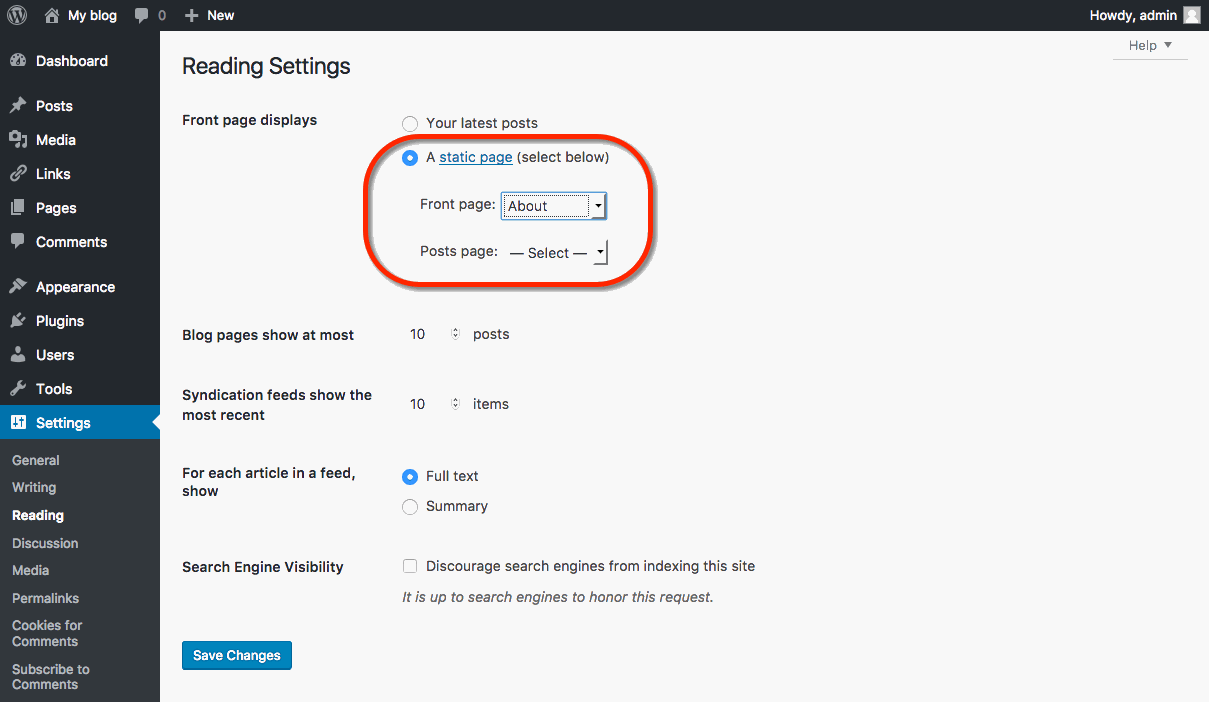
  3. Normally, the front page displays your latest blog posts. What we want to do instead is select a Page from the website. Obviously, this page has to exist before you can select it. Select the “A static page” radio button and choose the About page from the Front page drop-down menu (an About page was created for you when you installed WordPress). Press the Save Changes button and now you will have the “About” page as your Front page. Edit it as you see fit and provide a good welcoming page for your visitors. screen shot of Word press reading settings
  4. But wait. What will happen to your blog posts? Most people will want them as the “dynamic” part of your site. First, create a new Page.screen shot of
  5. Title it Blog (you can title it whatever you want but Blog is common and descriptive). Leave the page blank (don’t type any text in the edit box) and Publish it.screen shot of adding a new post
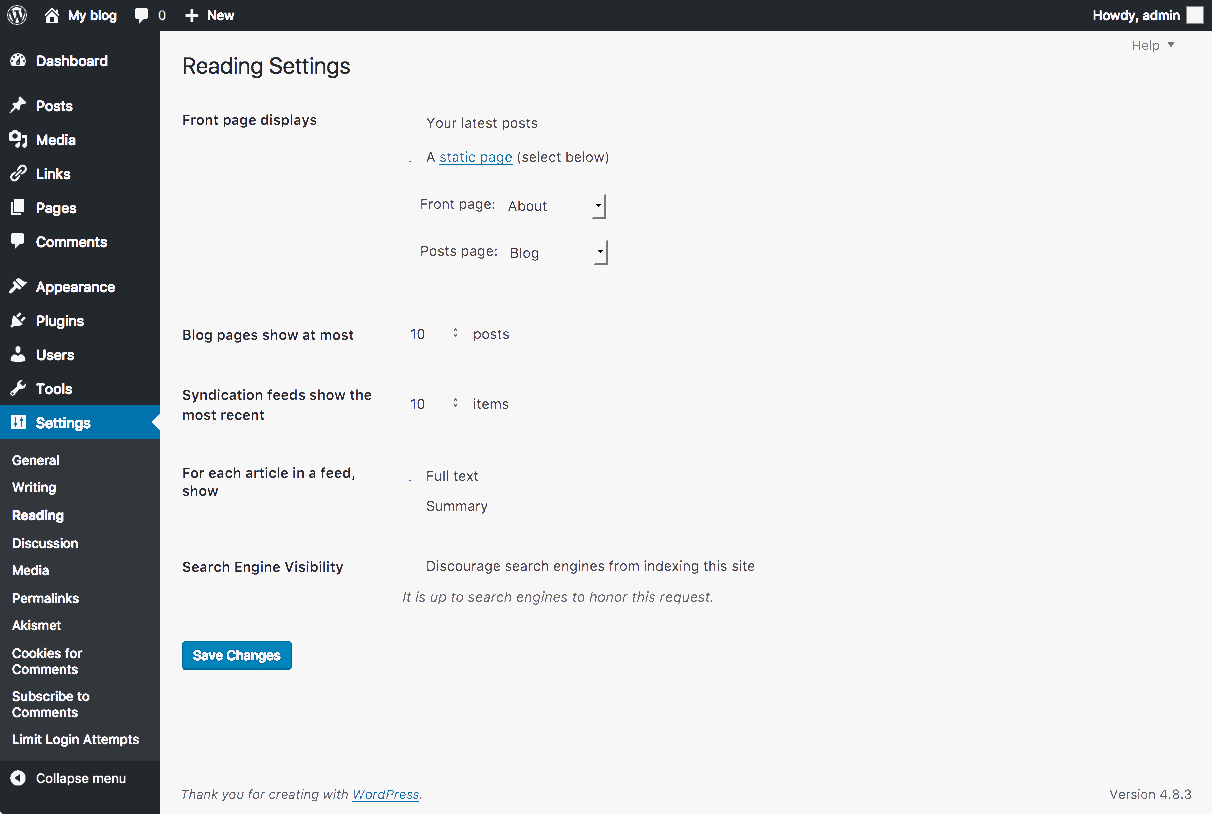
  6. Now go back to Settings > Reading. Under the static page area choose Blog from the Posts page drop-down.select new WP post page
  7. Click the Save Changes button. Now your “home” page will actually display the About page. You will also have a Blog item in your menu (depending on your theme, you may have to customize your page display to see pages).
  8. If you click on the Blog menu item, you will then see your blog posts. Notice the /blog added to the web address.

Unlock your domain

This article only if you own your own top-level domain. If you have been using the free subdomain option with createuky.net through University of Kentucky, this does not apply to you.

Similarly, if you’re migrating your content to Reclaim Hosting, this article does not apply to you.

Transferring a domain you already own is not too much different from registering a new domain, except the transfer process requires an EPP code, or an agreement code between your old registrar and your new registrar that allows the release of your domain. Your new registrar will have information on how to transfer in a domain. When you start that process, you will be prompted to enter your EPP code.

How to find your EPP Code:

  1. To get started you’ll need to login to your control panel (https://createuky.net/dashboard) using your Haverford username and password.
  2. Once you’re logged in, you’ll see the cPanel interface.  Now click on the Manage Your Account menu at the top of your screen and select Migration Information.

3. Click the Lock button to unlock your University of Kentucky account.

4. Click Get Code. Once that’s done, the system will send you an email with your EPP code.

At this stage, here are a few items to note:

  • You’ll receive a series of emails from both your old and new registrars asking you to authorize the transfer. Please act on every email you receive in a timely fashion– even if the emails look like duplicates.
  • If you do not authorize the transfer in a timely fashion, the domain transfer will expire and you will need to start over.
  • The domain must be older than 60 days.
  • The domain must have no other transfers in the last 60 days.
  • The domain transfer process can take up to a week, depending on how fast your registrars work.
  • Once the domain transfer completes, you’ll receive a notification.

What Exactly is a Web Application?

In the most general terms, a Web application is a piece of software that runs on a Web server. A Web server is a just a specialized computer designed to host Web pages.

Most Web applications are comprised of two components: files and a database. When you install a Web application, you will need to make sure all of the files are copied over into the appropriate location AND that a database (and database user) has been set up to connect to those files. Often, you will have to do some configuration to make sure the application knows how to access the database.

The system we use for University of Kentucky uses a special script installer called Installatron (in cPanel) that allows you to automatically install dozens of open source applications. When you use Installatron, you don’t need to worry about moving files, creating databases, or doing the initial configuration. It’s all taken care of for you.

In order to run on the University of Kentucky server, Web applications must be able to run on a LAMP server, which is the particular kind of Web server that we use. Occasionally, a Web application may require additional components or modules that need to be installed on the server.